Applications
Applications are containers that group together cooperative guardrails and shared data assets. You can think of them as projects - they provide organizational structure and enable complex verification workflows through DAG (Directed Acyclic Graph) configurations.
Overview
An application in the platform corresponds to the verification assets for an external application or system. Applications provide several key capabilities:
- Organizational Structure: Group related guardrails together for better management
- Shared Context: Application-wide context documents that are automatically injected into all guardrails
- Complex Workflows: DAG configurations that orchestrate multiple guardrails with custom logic
- Centralized Management: Single point of control for all verification assets
Creating Applications
To create a new application:
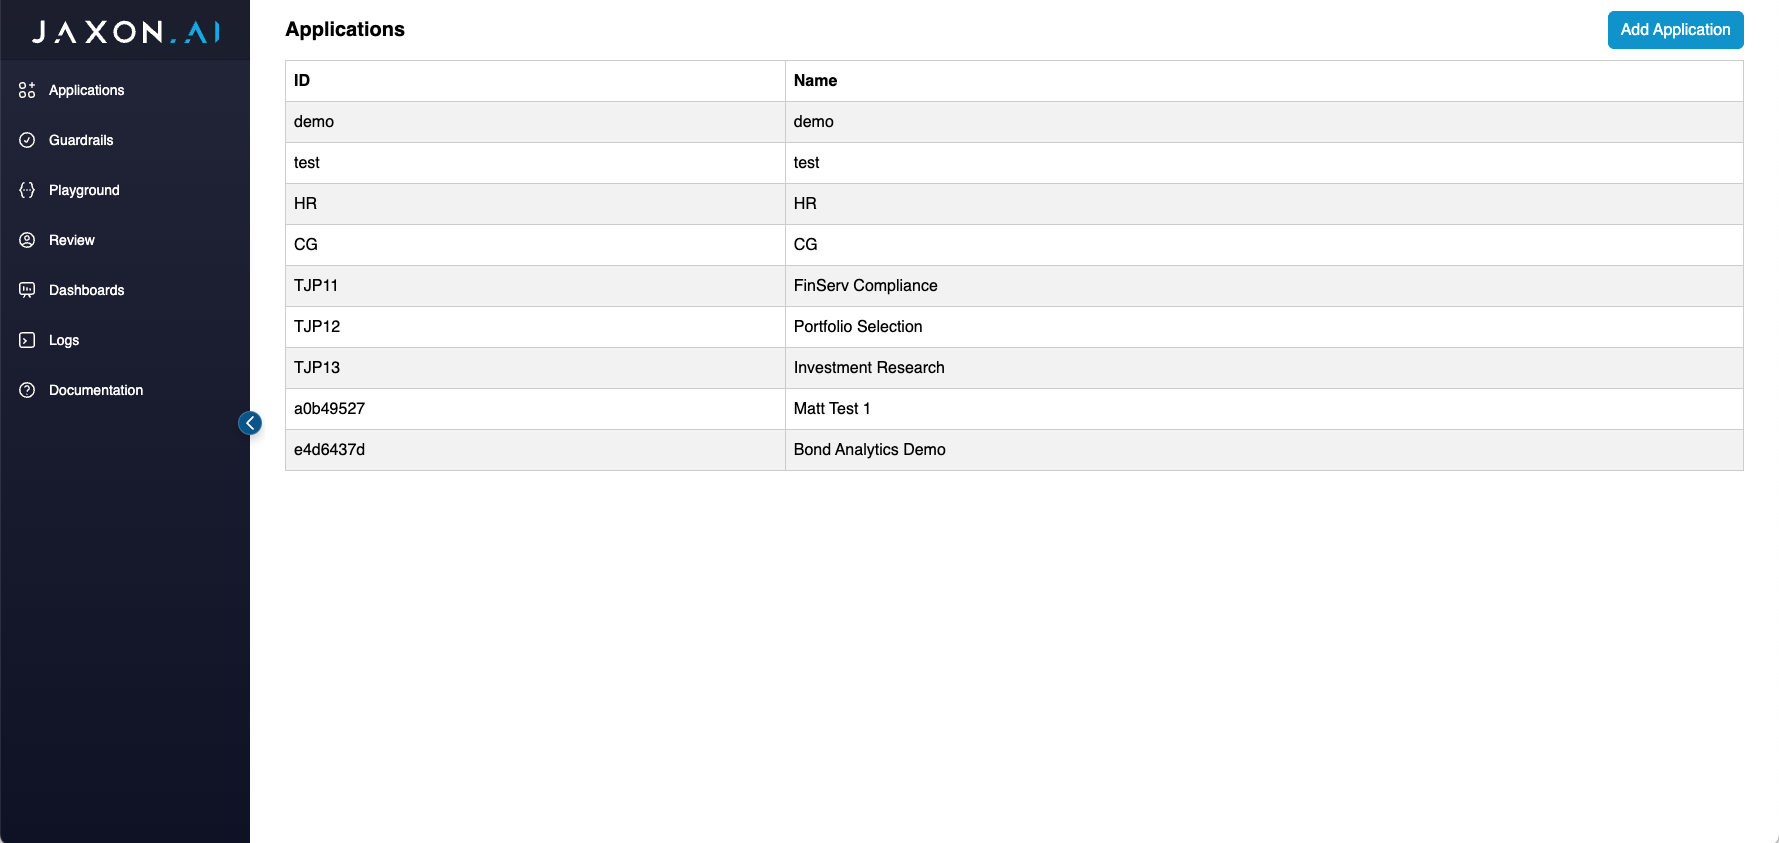
- Navigate to the Applications tab in the admin interface
- Click Add Application
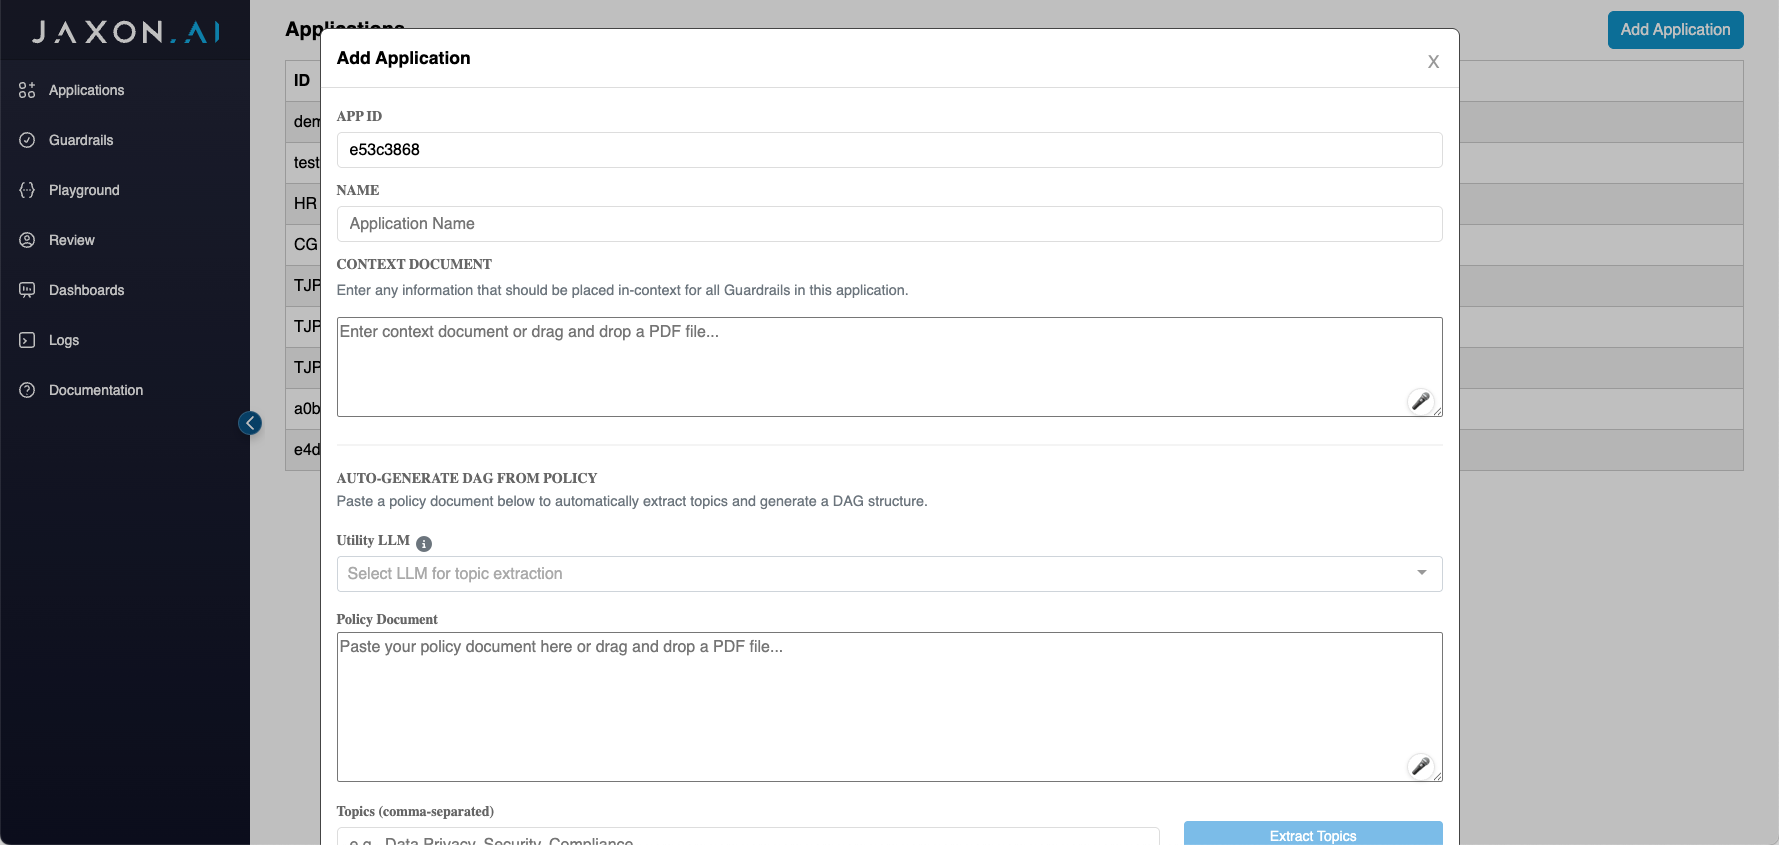
- Fill in the application details:
- Application ID: A unique identifier (auto-generated)
- Name: Human-readable name for the application
- Context Document: Optional shared context injected into all guardrails
Auto-DAG Generation from Policy Documents
The platform includes AI-powered DAG creation that can automatically analyze policy documents and generate complete verification workflows:
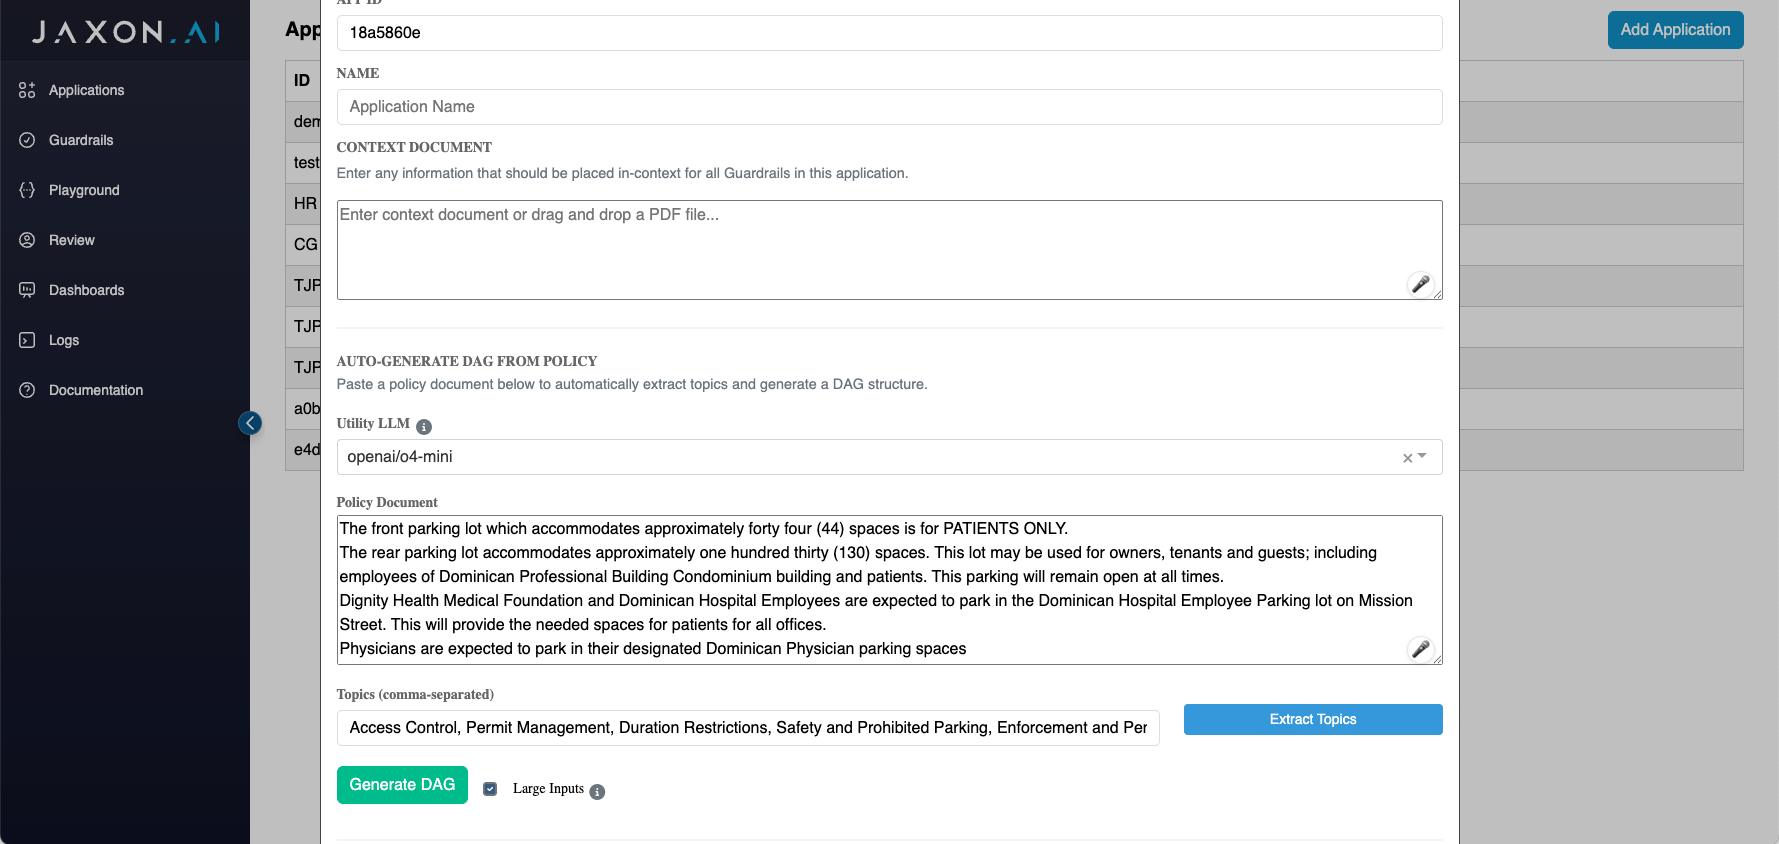
How it Works: 1. Select Utility LLM: Choose an LLM model for policy analysis 2. Input Policy Document: Paste your compliance document (regulations, standards, guidelines) 3. Extract Topics: LLM identifies 3-5 key compliance themes automatically 4. Generate DAG: Creates complete workflow with guardrail nodes, connections, and aggregation
Generated Structure: - Individual guardrail nodes for each topic (Data Privacy, Security Controls, etc.) - Proper dependencies and connections between nodes - Final aggregation node that combines all verification results - Placeholder guardrails that you can then configure with specific rules
Benefits: - Dramatically reduces DAG creation time - Ensures comprehensive coverage of policy requirements - Provides logical workflow organization - Creates consistent verification frameworks
After generation, navigate to the Guardrails tab to configure each placeholder guardrail with appropriate rules, LLM models, and validation logic.
Large Inputs Mode
When generating DAGs for applications that will process large documents, enable the "Large Inputs" checkbox next to the Generate DAG button. This modifies the DAG structure to handle document chunking efficiently:
Standard Mode (default): - Each guardrail directly connects to the final Aggregate Guardrails node - Suitable for smaller documents that fit within model context limits
Large Inputs Mode: - A Chunker node is automatically added at the beginning (connected to Start) - Each guardrail receives chunks from the Chunker node - Each guardrail connects to its own Aggregate Chunks node (set to "OR" mode) - All Aggregate Chunks nodes then feed into the final Aggregate Guardrails node - Automatically handles document chunking for processing large files
Chunk Aggregation Logic: - OR mode (default for Large Inputs): The guardrail passes if ANY chunk passes validation. This is useful for compliance checks where finding one valid instance is sufficient. - AND mode: The guardrail passes only if ALL chunks pass validation. This ensures comprehensive compliance across the entire document.
It's common practice to use both modes in different parts of your DAG, depending on the specific validation requirements.
Chunker Node Requirements
The Chunker node is essential for processing large documents that exceed model context limits:
Configuration: - Chunk Size: Configurable from 100 to 10,000 characters - Placement: Must be connected directly to the Start node - Purpose: Splits input documents into manageable chunks before processing
Validation Rules: - If your DAG contains Aggregate Chunks nodes, a Chunker node is required - The Chunker must be the first node after Start (no intermediate nodes) - Without a properly placed Chunker, the DAG will show as invalid (red status)
Usage Pattern:
Start → Chunker → Guardrails → Aggregate Chunks → Aggregate Guardrails
This ensures that large documents are properly segmented before being processed by guardrails, with results aggregated appropriately.
Application Context Documents
The Context Document field allows you to define application-wide information that gets automatically injected into all guardrails within the application. This is useful for:
- Shared facts or knowledge that apply to all verification scenarios
- Custom terminology or definitions specific to your domain
- Background information that provides context for guardrail evaluations
- Common rules or constraints that should apply universally
When a guardrail runs within an application, the context document content is automatically prepended to the guardrail's specific context, ensuring consistent background knowledge across all verification tasks.
DAGs (Directed Acyclic Graphs)
DAGs provide a powerful orchestration framework that enables complex verification workflows by combining multiple guardrails with custom logic. Unlike individual guardrails that operate in isolation, DAGs allow you to:
- Execute multiple guardrails in parallel for comprehensive analysis
- Chain guardrails together with dependencies
- Aggregate results from multiple sources using customizable logic
- Implement sophisticated verification pipelines with conditional execution
DAG Editor
The visual DAG editor provides an intuitive interface for building complex verification workflows:
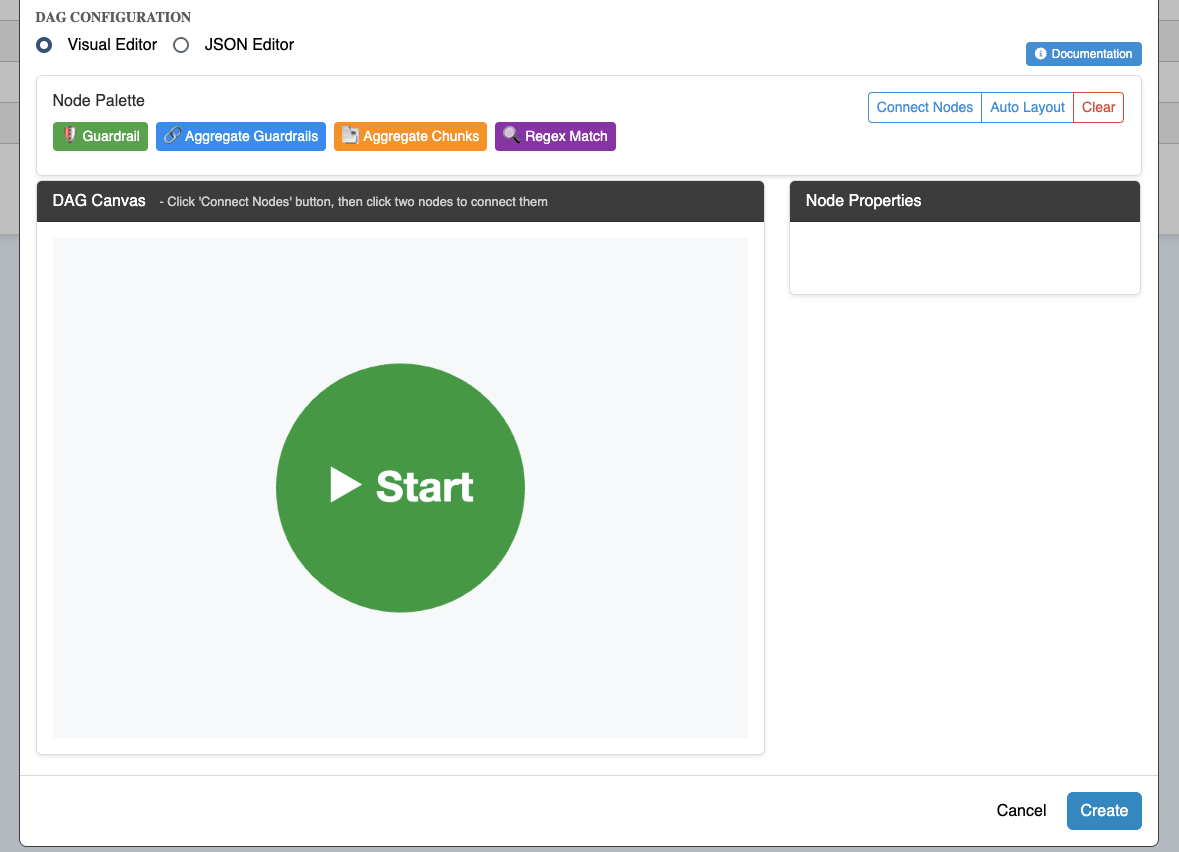
Key Features:
- Visual Node Palette: Drag and drop different node types to build your workflow
- Connection Mode: Click to connect nodes and define dependencies
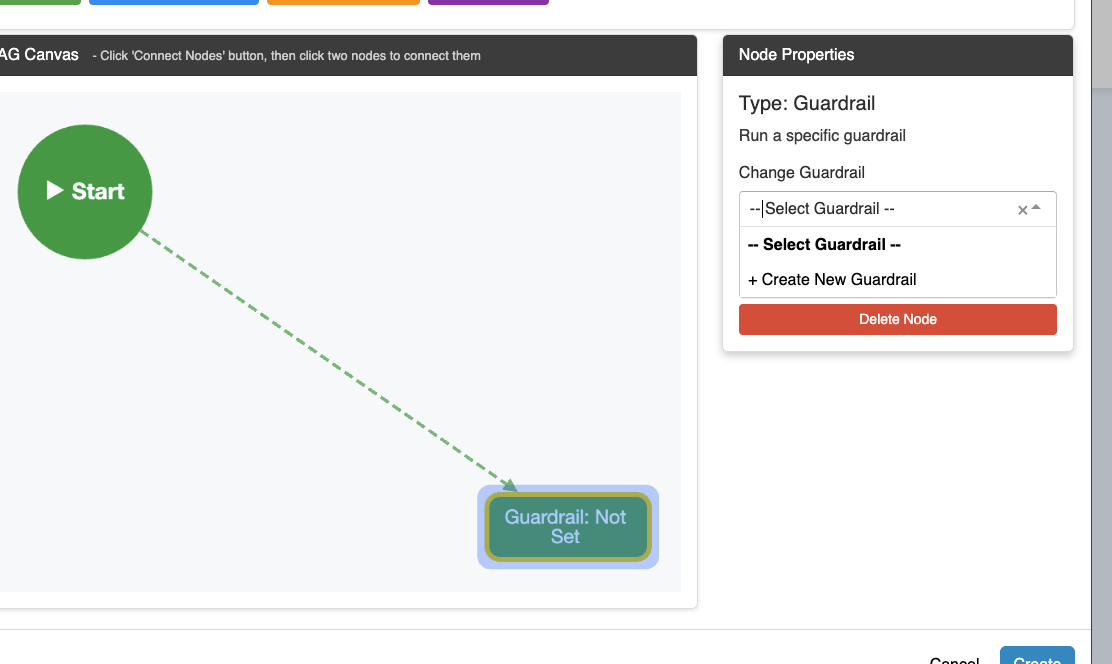
- Node Properties Panel: Configure individual nodes with specific settings
- Auto Layout: Automatically organize nodes for optimal visualization
- JSON Editor: Switch to raw JSON editing for advanced configurations
Node Types:
- 🛡️ Guardrail: Execute an individual guardrail within the workflow
- ✂️ Chunker: Split large documents into manageable chunks for processing
- 🔗 Aggregate Guardrails: Combine results from multiple guardrails using AND/OR logic
- 📑 Aggregate Chunks: Combine results from document chunks using AND/OR logic
- 🔍 Regex Match: Pattern matching using regular expressions
Building DAG Workflows
Step 1: Add Nodes Click on node types in the palette to add them to the canvas:

Step 2: Configure Nodes Select any node to view its properties panel and configure:
- Guardrail Nodes: Select which guardrail to execute
- Chunker Nodes: Set chunk size (100-10000 characters)
- Aggregation Nodes: Choose combination logic (AND/OR)
- Regex Nodes: Define patterns to match
Step 3: Connect Nodes Use the Connect Nodes button to link nodes together:
- Click Connect Nodes to enter connection mode
- Click the source node (where data flows from)
- Click the target node (where data flows to)
- The connection is automatically created
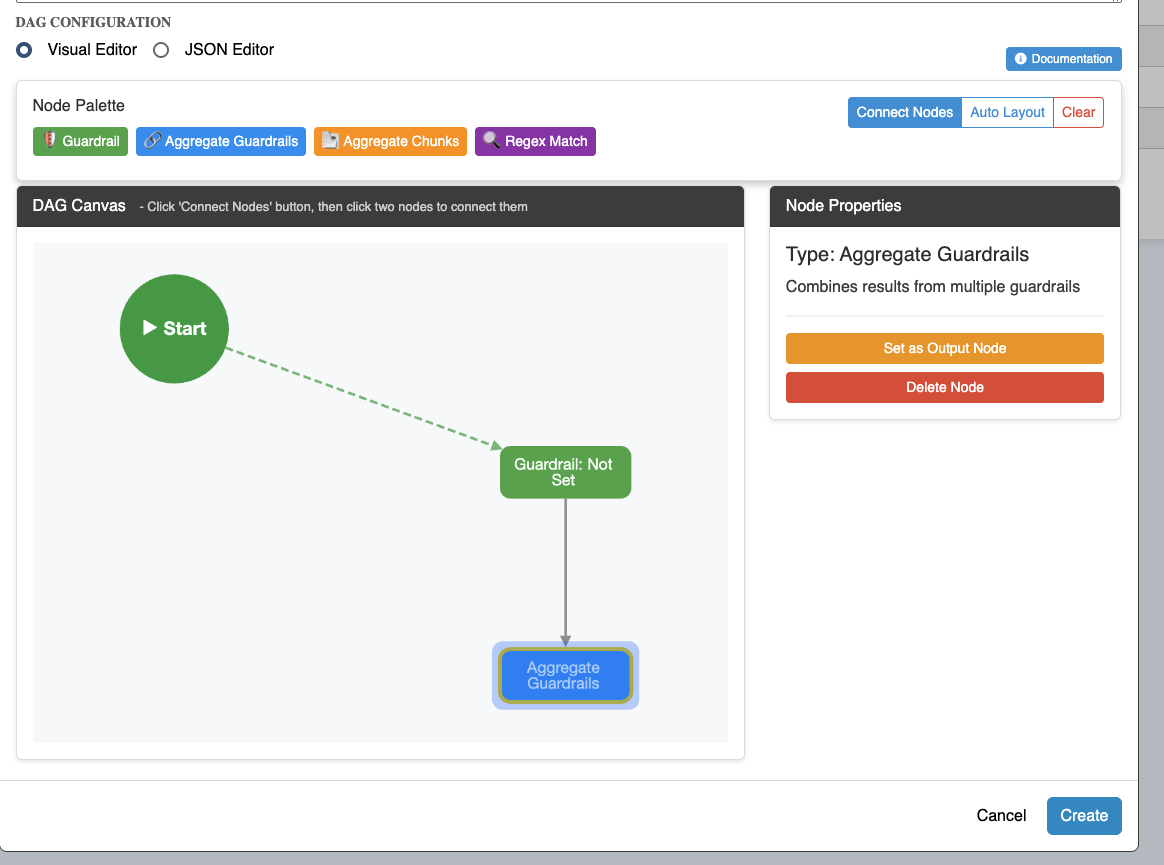
Step 4: Set Output Node Select the final node and click Set as Output Node to designate which node's result becomes the DAG output.
DAG JSON Configuration
For advanced users, you can switch to JSON Editor mode to directly edit the DAG configuration:
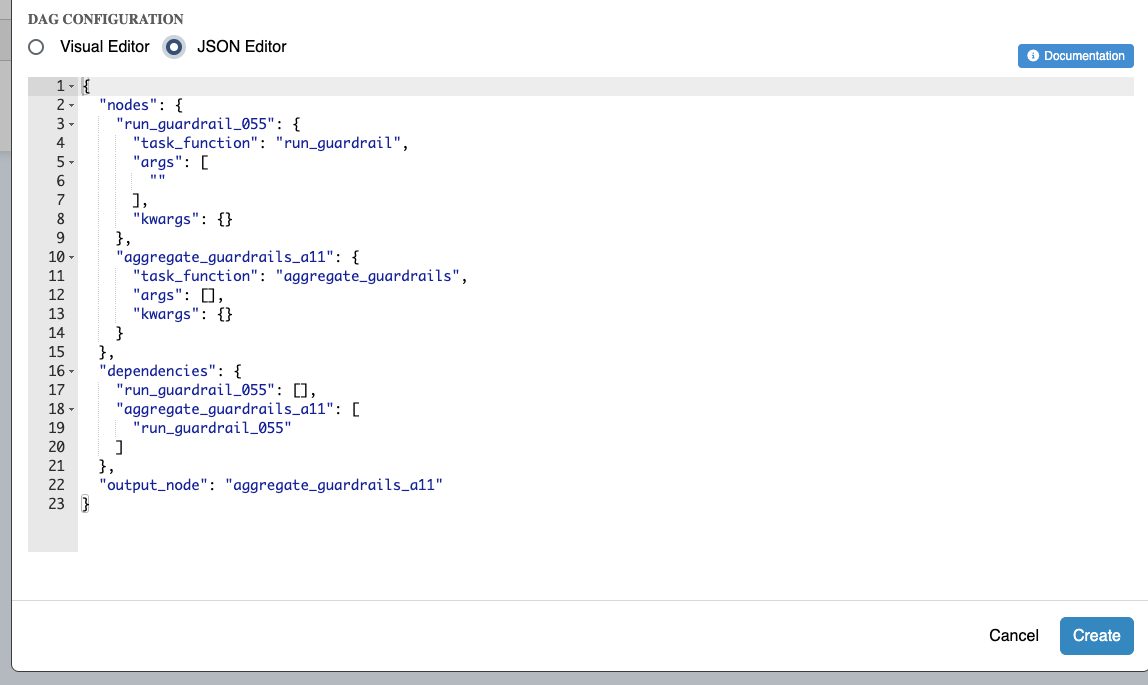
Example DAG configuration:
{
  "nodes": {
    "pnp_guardrail": {
      "task_function": "run_guardrail",
      "args": ["guardrail_id_here"],
      "kwargs": {}
    },
    "content_check": {
      "task_function": "run_guardrail",
      "args": ["another_guardrail_id"],
      "kwargs": {}
    },
    "final_aggregation": {
      "task_function": "aggregate_guardrails",
      "args": [],
      "kwargs": {
        "combine_mode": "AND"
      }
    }
  },
  "dependencies": {
    "pnp_guardrail": [],
    "content_check": [],
    "final_aggregation": ["pnp_guardrail", "content_check"]
  },
  "output_node": "final_aggregation"
}
Configuration Elements:
- nodes: Defines all tasks in the DAG with their configuration
- dependencies: Specifies which nodes depend on others
- output_node: Identifies which node's result becomes the final DAG output
DAG Execution Flow
The DAG system automatically determines execution flow based on dependencies:
Execution Rules:
- Nodes without dependencies: Automatically receive the input entailment frame
- Nodes with dependencies: Receive results from their dependency nodes
- Parallel execution: Independent nodes run simultaneously for optimal performance
- Sequential chains: Dependent nodes wait for their prerequisites to complete
DAG Status Validation
The platform provides real-time validation and status indicators to ensure your DAGs are properly configured and ready for execution:
Status Indicators:
- 🟢 Green: DAG is fully configured and ready to run
- 🟡 Yellow: DAG has minor issues but may still be functional
- 🔴 Red: DAG has critical errors and cannot be executed
Common Validation Checks:
- Node Configuration: All nodes have required parameters filled
- Guardrail References: Referenced guardrails exist and are properly configured
- Output Node: A valid output node is designated
- Connectivity: All nodes are properly connected in the workflow
- LLM Requirements: Required LLM models are selected for operations
Interactive Tooltips: When DAG elements have issues, hover over disabled buttons to see specific requirements: - "Please select: Main LLM, Utility LLM, Embedding Model" - "Please provide: topics, Utility LLM" - "Please select a Utility LLM for topic extraction"
Button State Management: The interface intelligently enables/disables functionality based on current configuration: - Extract Topics: Requires Utility LLM selection - Generate DAG: Requires both topics and Utility LLM - Policy Rules Operations: Require all three LLM types (Main, Utility, Embedding)
Running Applications
Applications with DAGs are executed through the same client interface as individual guardrails, but using the application ID instead of a guardrail ID:
from jaxon import Client
from jaxon.vendor.data_model import EntailmentFrame

client = Client()
frame = EntailmentFrame(
    C=["Your document content"],
    Q="Your question",
    A="Answer to verify"
)

# Use application ID to run the DAG
try:
    request_id, trace_id = client.send_message("your_app_id", "response_topic", frame)
    response = client.get_response(trace_id, "response_topic", timeout=300000)
except ValueError as e:
    print(f"Validation error: {e}")
    # Handle red status application
Client-Side Validation
The Jaxon client now includes pre-flight validation that prevents execution of applications or guardrails with red status:
Validation Checks: - Guardrail Status: Ensures referenced guardrails are properly configured and not in "undefined" state - DAG Structure: Validates that DAGs have required nodes and proper connectivity - Output Nodes: Confirms output nodes are properly specified - Dependency Integrity: Verifies all node dependencies are satisfied
Error Handling: When attempting to run invalid targets, the client immediately returns descriptive error messages:
ValueError: Rail 'abc123' is not in a runnable state: rail configuration is invalid, rail type is undefined

ValueError: Application 'myapp' DAG 'dag1' references invalid guardrail: Rail 'xyz789' is not in a runnable state: rail type is undefined

ValueError: Application 'myapp' DAG 'dag1' has no output node specified
Batch Processing:
For batch operations, validation failures are logged and recorded with status validation_failed, allowing the batch to continue processing valid items while clearly identifying problematic ones.
Managing Applications
Editing Applications: Click on any application in the list to open the edit modal where you can:
- Update the application name
- Modify the context document
- Edit the DAG configuration using the visual or JSON editor
Deleting Applications: Use the Delete button in the edit modal to permanently remove an application and all its associated guardrails.
⚠️ Warning: Deleting an application will also delete all guardrails contained within it. This action cannot be undone.
Best Practices
Application Organization: - Group related guardrails that work together toward a common verification goal - Use descriptive names that clearly indicate the application's purpose - Keep applications focused - avoid creating overly broad "catch-all" applications
Context Documents: - Include only information that applies to ALL guardrails in the application - Keep context concise but comprehensive - Update context documents when domain knowledge changes
Auto-DAG Generation: - Use clear, well-structured policy documents for better topic extraction - Review extracted topics before generating DAGs - edit manually if needed - Start with auto-generated DAGs then customize as needed - Ensure your Utility LLM is properly configured before beginning - Break very large policy documents into logical sections for better results
DAG Design: - Start simple and add complexity incrementally - Use descriptive node IDs that indicate their purpose - Test individual guardrails before incorporating them into DAGs - Consider performance implications of parallel vs sequential execution - Regularly check DAG status indicators to ensure everything is properly configured
LLM Configuration: - Configure all required LLM models (Main, Utility, Embedding) before building complex workflows - Test LLM connectivity before relying on auto-generation features - Use appropriate LLM models for your specific use case and domain - Monitor LLM quota usage when using auto-generation features frequently
Validation and Testing:
- Always check DAG status indicators before deploying to production
- Test with the client library to catch validation issues early
- Handle ValueError exceptions in your client code for graceful error handling
- Use the playground to test individual components before building complete DAGs
Version Control: - Export DAG JSON configurations for backup - Document significant changes to DAG structures - Test thoroughly after any DAG modifications - Keep records of successful auto-generation prompts and policy documents